Free Ways to Speed Up Laptop
Reviving Your Sluggish Laptop: Free Speed Boosting Techniques
Is your once-speedy laptop now crawling at a snail's pace? Before you reach for your credit card or consider a replacement, try these cost-free optimization methods that could breathe new life into your machine.
Windows laptops naturally lose performance over time due to various factors including fragmented files, background processes, and accumulated digital clutter. The good news? You can often restore significant performance without spending a penny.
Start by examining what's running in the background. Many applications continue operating even after you've closed their main window. Check your system tray (the small icons near your clock) and right-click to exit any unnecessary programs.
Next, manage your startup items. Too many programs launching when Windows boots can dramatically slow down your system. Access Task Manager by pressing Ctrl+Shift+Esc, navigate to the Startup tab, and disable non-essential applications.
Regular maintenance is crucial for optimal performance. Keep Windows and your drivers updated to ensure security and efficiency. Delete temporary files and downloads you no longer need. For a thorough cleanup, use the built-in Disk Cleanup utility.
Identify resource-hungry applications through Task Manager. If certain programs consistently consume excessive CPU or memory, consider alternatives or adjust their settings.
Power settings can significantly impact performance. Switch from "Power saver" to "High performance" when you need maximum speed and are connected to a power source.
Remove unused programs completely rather than letting them occupy valuable disk space. Review your installed applications regularly and uninstall those you no longer use.
Defragmenting your hard drive (for traditional HDDs) can substantially improve access speeds by reorganizing fragmented files. For SSDs, this isn't necessary, but enabling TRIM support is beneficial.
Visual effects, while attractive, can consume system resources. Adjust your visual settings to prioritize performance over appearance if speed is your primary concern.
Finally, restart your computer regularly. This simple step clears memory, terminates stuck processes, and often resolves performance issues without any technical intervention.
Speed Up Your Laptop Boot Time by Managing Startup Programs
Many software installations include a default setting to launch automatically when your computer starts. This seemingly harmless option can significantly slow down your boot time as more programs pile up.
To reclaim faster startup performance:
Windows 8/10/11 Users:
- Access Task Manager by right-clicking the taskbar or pressing Ctrl+Shift+Esc
- Navigate to the "Startup" tab
- Review each program and its startup impact
- Right-click unnecessary programs and select "Disable"
Windows 7 Users:
- Search for "System Configuration" in the Start menu
- Open the application and go to the Startup tab
- Uncheck boxes next to non-essential programs
- Click Apply and restart your computer
Remember, disabling startup items doesn't remove the programs from your computer—you can still launch them manually when needed. Focus on keeping only essential security tools and critical applications in your startup sequence.
Ensuring Your System Runs Optimally
When managing startup applications, it's wise to exercise caution. A good rule of thumb is to leave Microsoft-published programs untouched, as these are typically essential for proper system functioning.
Regular system maintenance plays a crucial role in maximizing laptop performance. Windows automatically notifies users when updates are available, but many people repeatedly postpone these important installations.
To verify your update status:
- Click the Start button
- Select Settings (or look for the gear icon)
- Navigate to Windows Update directly (on newer systems)
- For older Windows versions, go to Updates & Security first, then select Windows Update
Keeping your operating system current not only enhances security but can significantly improve overall performance by optimizing system processes and fixing performance bugs.
Keeping your drivers and applications updated is crucial for both security and performance. A simple online search can help you determine if your system has the latest drivers installed.
Over time, your computer can accumulate a lot of unnecessary files, much like a cluttered closet. Regularly adding software and large files, such as high-resolution images, audio, and videos, can significantly reduce available storage space.
Make it a routine to regularly clean up your computer by deleting unused files and emptying the recycle bin. This prevents your system from being bogged down with unnecessary data.
A useful tip: Hard Disk Drives (HDDs) typically operate at their best until they reach about 90% capacity. If your HDD is over 90% full, this could be the reason for your slowdown. Solid State Drives (SSDs), on the other hand, experience a more gradual decline in performance as they fill up. It's advisable to keep your SSD usage below 75% of its total capacity.
If you notice a sudden drop in your PC's performance, a specific program might be the culprit. To identify the issue, check your Task Manager to see which programs are using the most resources.
To do this, right-click on the taskbar and select Task Manager . Then, click on the Processes tab to view details about the programs currently running on your computer.
Optimize Laptop Performance
Prioritize energy settings adjustments for immediate performance boosts
Navigate to your system tray's battery indicator and access power management
Switch from default balanced mode to maximum throughput configuration
For customized energy profiles, launch Control Panel's power scheme editor
Duplicate an existing plan and modify processor/cooling preferences
Monitor battery drain when using enhanced performance modes
Identify resource-hungry programs through process organization tools
Sort running applications by CPU/Memory/Disk consumption percentages
Terminate unresponsive software via context menu force-quit option
Legacy systems require alternative access through startup configuration menus
Manage background services and startup programs through system utilities
Combine hardware optimization with software tweaks for best results
Optimize background processes by adjusting system energy profiles beyond basic sleep timers—tweak CPU performance states or disable unnecessary hardware functions in hidden settings.
Conduct a digital spring cleaning: audit installed applications and ruthlessly remove anything gathering dust. Even small, forgotten tools can hog storage and background resources over time.
Explore your operating system's storage analyzer to expose space-hogging programs you haven't launched in months. Many apps leave residual files that accumulate like digital cobwebs.
For power users, modify how your device allocates resources when plugged in versus battery mode—balance between energy savings and processing muscle based on your usage patterns.
Investigate system tray utilities and auto-start programs that launch silently during bootup. These invisible passengers often contribute more to sluggishness than main applications.
To free up space and potentially speed up your laptop, start by removing unnecessary programs. Access the Control Panel, then go to Programs, and select 'Uninstall a program' (or 'Programs and Features' in some older versions).
Review the list of installed programs and decide which ones you can do without. Even if you occasionally use certain software, consider uninstalling it and reinstalling when needed.
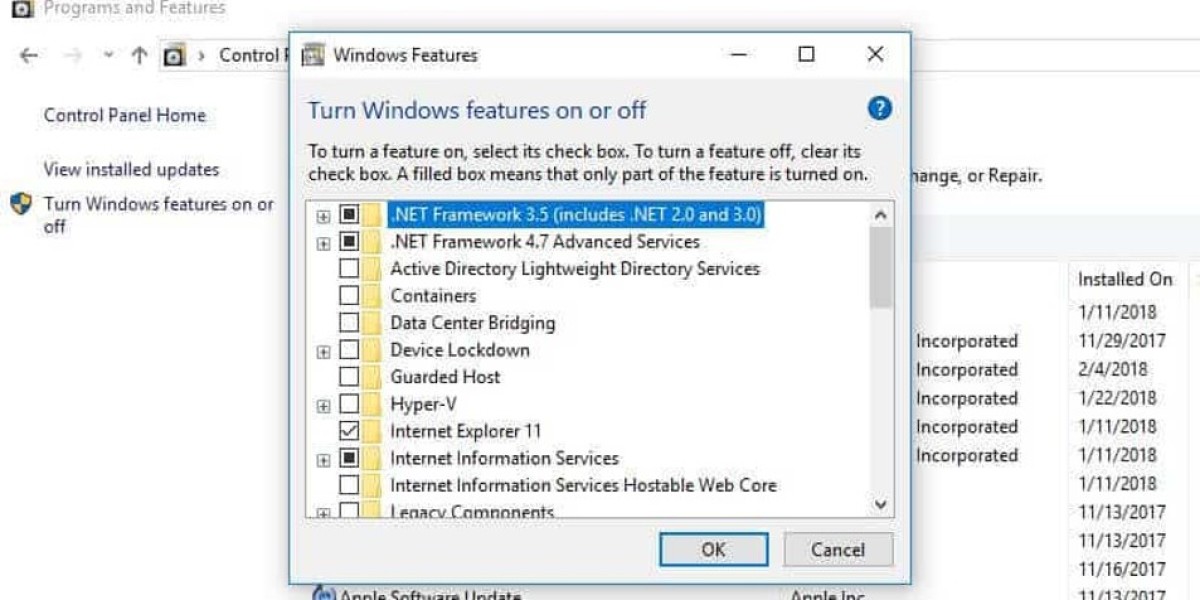
While in the 'Programs and Features' section, take a moment to explore further. Click on 'Turn Windows features on or off' to see a list of additional components. Disable any that you find are not essential for your daily tasks.
Before making any changes to your system settings, it's important to research any unfamiliar programs or processes. A quick online search can help you determine what's safe to disable and what's necessary for your laptop to function properly.
Over time, your laptop accumulates temporary files, cached data, and other digital clutter that can significantly impact performance. Regular maintenance is essential for keeping your system running smoothly.
Windows includes a helpful built-in utility called Disk Clean-up that can remove unnecessary files and free up valuable storage space. Running this tool every few months is recommended for optimal performance.
To access Disk Clean-up on current Windows versions:
- Open Control Panel
- Navigate to System and Security
- Select Windows Tools
- Click on Disk Clean-up
If you're using an older Windows version, the path is slightly different:
- Open Control Panel
- Go to System and Security
- Look under Administrative Tools
- Select Disk Clean-up
Once open, the utility will scan your system and present options for removing various types of unnecessary files, allowing you to reclaim space and potentially improve performance.
Free Ways to Boost Laptop Performance
For those seeking automated solutions, third-party optimization tools like iolo System Mechanic offer real-time clutter removal
and background performance tuning without manual effort.
These programs handle tasks such as managing browsing traces, adjusting application priorities,
and streamlining storage through defragmentation—all while continuously monitoring system health.
A budget-friendly alternative exists through built-in Windows utilities:
navigate to disk cleanup options, select temporary/cached file categories,
and execute system file purification with a few clicks—no financial investment required.
While premium software (approximately $50 annually) provides convenience and advanced features,
the native cleanup method remains entirely cost-free for hands-on users.
Files on your computer can become scattered over time, causing your system to slow down as it searches multiple locations for necessary data. This fragmentation affects traditional hard disk drives (HDDs) and impacts overall performance.
Windows automatically schedules weekly defragmentation, but you can manually initiate this process if you notice your laptop running sluggishly.
Important: Only defragment mechanical hard drives (HDDs). Solid state drives (SSDs) use different technology and don't benefit from defragmentation. If your system contains both drive types, focus solely on the HDD.
To manually defragment your drive:
- Press the Windows key on your keyboard
- Type "defragment" in the search bar
- Select the defragmentation tool from the results
This simple maintenance task reorganizes fragmented files, allowing your computer to access data more efficiently and potentially improving speed without any financial investment.
A screen labeled Optimize Drives will subsequently appear.
To enhance your laptop's speed, start by checking the type of drives you have. For SSDs, defragmentation is unnecessary; if you attempt to analyze them, the option will appear grayed out. For HDDs, select the drive and click Analyze to check its fragmentation level. Aim to keep this below 5%. If it exceeds that, use the Optimize option to defragment the disk.
For SSDs, the Optimize button is still available but serves a different purpose. It runs the TRIM command, which helps maintain performance by cleaning up data no longer in use.
If you're using Windows 7, search for Disk Defragmenter and choose an HDD from the Current Status section to begin the process.
As newer versions of Windows are released, the operating system incorporates more animations and graphics, enhancing the user interface's appearance. However, this can also slow down your device. To mitigate this, you can tweak the settings. Navigate to Control Panel > System and Security > System > Advanced System Settings . In the Performance section, click Settings to access a list of options to adjust. By fine-tuning these settings, you can potentially free up some processing power and improve your laptop's speed.
Enhancing Laptop Performance: Simple and Free Solutions
Optimize Visual Settings
Windows allows you to adjust visual effects to improve performance. Consider disabling unnecessary animations and visual elements that consume processing power. In Windows 7, access these settings through "Performance Information and Tools" and select "Adjust Visual Effects." For the best results, choose "Adjust for best performance" or selectively disable effects like fades and shadows.
Browser Management
Your browser can significantly impact laptop speed. Regular maintenance is essential:
• Close unused tabs to free up RAM
• Restart your browser periodically to clear temporary files
• Install ad-blockers like AdBlock Plus to reduce resource usage
• Add privacy extensions such as Privacy Badger or uBlock Origin
• Clear cookies and cache regularly
• Keep your browser updated with the latest version
Malware Protection Without Performance Cost
Malicious software can severely degrade laptop performance. While antivirus protection is crucial, choose lightweight solutions:
• Select antivirus programs optimized for performance
• Consider free alternatives that don't drain system resources
• Use on-demand scanners like Zemana Antimalware for periodic checks
• Remove detected threats with specialized tools like Malwarebytes
Resource Management
Be mindful of how you use your computer:
• Avoid running too many programs simultaneously
• Close applications completely rather than minimizing them
• Restart your laptop regularly to clear memory and apply updates
• Schedule resource-intensive downloads for overnight hours
• Lower graphics settings in games and applications
Maintenance Practices
Regular maintenance can prevent slowdowns:
• Remove dust from vents and fans yearly to prevent overheating
• Uninstall unused applications and browser extensions
• Use memory-saving browser extensions
• Consider reinstalling your operating system if performance issues persist
Hardware Considerations
If software solutions aren't sufficient, consider these affordable upgrades:
• Install an SSD to dramatically improve load times
• Add more RAM if you frequently multitask
• Clean internal components to prevent thermal throttling
By implementing these free strategies, you can significantly improve your laptop's performance without spending money on a new device.
What is a Netflix VPN and How to Get One
Netflix VPN is a specialized virtual private network service that enables users to bypass geographical restrictions on Netflix's content library by routing their internet connection through servers in different countries. This technology allows subscribers to access shows and movies that might be exclusive to other regions, effectively expanding their viewing options beyond what's available in their local Netflix catalog.
Why Choose SafeShell as Your Netflix VPN?
If you're tired of encountering the frustrating " Netflix vpn not working " message when trying to access region-restricted content, you may want to consider SafeShell VPN as your streaming solution. This powerful VPN service stands out with its high-speed servers specifically optimized for Netflix streaming, ensuring buffer-free playback in high definition. What makes SafeShell VPN particularly appealing is its exclusive App Mode feature, which allows users to unlock and enjoy content from multiple regions simultaneously, expanding your entertainment options significantly.
SafeShell VPN also offers impressive versatility by supporting connection on up to five devices at once across various operating systems including Windows, macOS, iOS, Android, and even Apple Vision Pro. Your online security remains paramount with their proprietary "ShellGuard" VPN protocol, providing advanced encryption for your browsing sessions. Additionally, SafeShell VPN eliminates bandwidth limitations, delivering lightning-fast speeds without throttling, and offers a flexible free trial plan so you can experience all these benefits before committing to a subscription.
A Step-by-Step Guide to Watch Netflix with SafeShell VPN
Unlocking global Netflix content is a breeze with SafeShell Netflix VPN . Here's how to get started:
- First, head to SafeShell VPN's website and select a subscription plan that matches your needs
- Next, download the SafeShell application for your specific device from their official website
- After installation, open the app and log into your account
- For the best streaming experience, select the APP mode which is optimized for Netflix viewing
- Browse through the server list and connect to a location where your desired Netflix content is available
- Finally, open your Netflix app or website and sign in to enjoy unrestricted access to region-specific shows and movies